Category: Linux/UNIX

  • Restoring Dual Boot funtionality

    Okay i had to format my windows partition on the laptop. No big deal.. just pop in the old windows disc, and do a fresh install (after proper backup of course :p) to the correct partition.

    However i like to use my laptop for Ubuntu also, and thus have dual boot. But windows insists on having control over the whole MBR. Hmm so this install lost me my dual boot functionality. Technically all i lost was the GRUB install that allowed me to boot from Ubuntu’s partitions.

    Normally i would do a complete reinstall of the whole machine, taking me about a whole day considering all the programs i use, and backups to restore. However i didnt feel like this grand gesture, and was pressed for time.

    A quick search gave me the quick fix for restoring dual boot functionality thus saving me some time. So here is the solution to re-install GRUB after installing Windows or in some other messing up your MBR

    1. Boot into Ubuntu using the Live CD. I used Ubuntu 8.04 currently.
    2. Open a terminal. Applications -> Accessories -> Terminal
    3. In the terminal type the follwing steps:
    4. sudo grub
    5. This should result in a GRUB Prompt with grub>
    6. find /boot/grub/stage1
    7. Remember this information
    8. root (hd0,4)
    9. setup (hd0)
    10. And you are done!

    The above is a simple rewrite of the instructions found on the official Ubuntu help.

    After following the steps you restart and everything should be working normally again 😀

    source:
    Recovering Ubuntu after installing Windows

  • Prevent Gnome-Do from popping up at logon (Ubuntu)

    I found this usefull little tip over at LifeHacker. I was minorly, but nevertheless constantly, annoyed when i booted into Ubuntu. Gnome-Do would pop up, and i would have to click to mouse to make it dissapear.

    I as pr. usual just accepted it as one of the little quirks of any system. I have a ton of them in all my operating systems, that i hardly ever notice anymore. I am simply used to routinely doing whatever workaround is available without thinking much about it.

    But let us all rejoice and click the link to LifeHacker below and only see Gnome-Do when we actually activate it :p

    Instructions:

    If you want to run Gnome Do at start up but don’t like it popping up every time u log on ,this tip is for you

    In System->Preferences->Session

    Click Edit and append –quiet to the command

    Done.
    Gnome Do will now start hidden

    Source:

    http://lifehacker.com/387494/prevent-gnome-do-from-popping-up-at-logon

  • Linux Video Tutorials from MartinCo

    My friend MartinCo over at 3dbuzz made a continuation of some Linux Video Tutorials I started a while back.

    I thought it was an really awesome idea and I am glad he was able to continue and make a few more than I had time to when I started myself. Problem with making video tutorials is that it takes more time than the video itself, and any screw ups means you will have to do a retake 🙁

    Anyhow head on over and check out the videos, and the thread:

    Linux VTM thread on 3dbuzz.com

    Martin’s Mind Wonders (videos themselves)

  • Ubuntu 8.04 First Look

    Okay I immediately downloaded and backed my Ubuntu partition up on Dustpuppy (my loving laptop). Takes a while to make the backup, but i was exited through the whole process to get a clean, new, fresh and hopefully faster Ubuntu install.

    Gparted

    First off I resized my NTFS partition to be a bit bigger. Been using my windows partition heavily for Photoshop and development (side effect of being away from home alot due to heavy university load). The whole process of deleting the old Ubuntu partitions, resizing the NTFS leaving me with about 70 GB free unpartitioned space went like a breeze with Gparted from the live cd.

    Install

    The installation went easy as ever. No problems, easy to install and extremely fast. My backup took way longer than the install did. After install i was greeted by the Grub bootloader and without a hitch could choose both Windows XP and my Ubuntu 8.04 install. A short bootload later and the brown welcome screen greets me.

    First impressions

    I love it! Its running smoothly, 3d was easy to install… basically everything just works! I immediately fired up Synaptic and started typing in my commonly used applications. Here i hit my first snag.. overload on the repositories. A download speed of about 20kb/sec wasn’t that fine when i had a ton of stuff to download. But a pleasant surprise was in store as i under the “repositories” dialog for Synaptic could select “other” for the server i wanted to use. I expected to be greeted with a dialog asking for a specific server URL, but was extremely pleasantly surprised when i see a precompiled list of servers. Further more a button allows me to quickly test all servers to find the fastest one. I select that fastest and a minute later im flying the downloads at 1 Mb/sec !

    Screenshot-Software Sources

    Screenshot-Choose a Download Server

    Screenshot-software-properties-gtk

    No Automatix

    I was sad to find that Automatix (homepage) was no longer in development. apparently some of the key developers were busy with normal life and at the same time got hired by the company behind a new distro. So no more automatix for now.

    However this was easily fixed as most of the packages i used from Automatix were available through Medibuntu.

    Conclusion

    I like it 😉 Fast, more stable and so far a lot of small improvements that i really like. Especially love the whole world clock applet, with weather forecast included.

    Links

  • Pidgin replacement for my aMSN ?

    I wish i could say i have been running aMSN for years. It feels like it, and it is almost true. However it has only been about 1 year since i discovered this delightfull alternative to MSN Messenger. Why ? Well i liked the MSN features but disliked the advertisements, extras, games and bloat i didnt need. Also i needed an alternative to use on my Ubuntu Box.

    My first experience with messenger on Linux was using Gaim. It worked but lacked some fundamental MSN features since it was multiple protocol based. So i never really liked it as much as using something messenger like.

    Finally i stumpled upon aMSN and i liked it. Was a bit buggy but worked for most cases. Back then nothing like offline messages and live spaces was in use mind you. Since then i have steadily been using aMSN for a long time since. Using it exclusively in fact. However i have had my frustrated moments. Mostly with file transfers failing and webcam crashing the application 🙁 But it worked and i was (for more features) using the svn edition which tends to break once in a while.

    Gaim become Pidgin

    Gaim later changes (Due to several legal issues with AOL and their AOL instant messenger AIM)) its name to Pidgin. I rediscover the application and test it out again. I like the simplistic feel and look of Pidgin and it performs without crashing and seems extremely stable and great. However i quickly find several small but usefull features missing; Personal Message, Offline Messages.

    Wanting to use this for my windows box i start searching for ways, or plans, to implement this into pidgin. Much to my despair i find that there either (conflicting statements) isn’t a practical way, nor any way, to implement a feature like the personal (highly used) messages into Pidgin. After long searches i find that apparently this feature is in an upcoming version of Pidgin but that doest do me any good now. I finally find a solution.

    MSN Pecan

    I discover MSN pecan which is basically an alternative MSN protocal for use with Pidgin that enables the personal messages, offline messages and much more. Im happy!. MSN-Pecan.
    I decide to test it out, and low and behold it works great!

    Featurelist:

    • Support for personal messages
    • Server-side storage for display names (private alias)
    • Partial direct connection support
    • Improved network IO
    • Improved error handling
    • Network issues tested with netem
    • GObject usage

    Conclusion:

    MSN-Pecan is a nice alternative (easy install) to recompiling pidgin from source just to get some of the most used MSN features in what is an amawing IM Client. So if you feel (little) adventurous give Pidgin + MSN-pecan a whirl!

    Links:

    Pidgin – a multi-protocol Instant Messaging client that allows you to use all of your IM accounts at once.

    MSN-Pecan – Alternative MSN protocol plugin for libpurple

  • Dustpuppy gets eyes! Making orbicam run on ubuntu

    My laptop, affectionately called ‘dustpuppy’, is of course running Ubuntu Linux 7.04. After my basic install i had only a few things that didn’t work. The primary non-functional issues was the integrated webcam and the flash card reader. And now webcam works.

    How to set it up. Well for this i mainly followed a tutorial available on the Ubuntu Forums by brazzmonkey. However i recreated it for personal use here. Im using an Acer Travelmate 4280 laptop, with 1.3 megapixel Orbicam integrated.

    First we need to make sure that the camera is detected

    lsusb

    and you should be getting something like this

    Bus 005 Device 002: ID 046d:0896 Logitech, Inc.

    Now we need to install some prerequisites to make able to build the drivers for the webcam

    sudo apt-get install build-essential linux-headers-$(uname -r)

    Now for getting the drivers. The main download page is here: http://mxhaard.free.fr/download.html
    At the time of writing the newest driver is gspcav1-20070508.tar.gz
    Lets unpack them

    tar zxvf gspcav1-20070508.tar.gz

    Compile and install the drivers

    cd gspcav1-20070508/
    make
    sudo make install

    Now we have the drivers compiled and installed. A personal note. On this laptop i moved the drivers to /opt/gspcav1-20070508/ before compiling, and installing. Just because i like to keep my own personal order in the folders.

    Next we need to tune the module before loading. I will explain why later, but its needed for colors to be shown correctly.

    sudo gedit /etc/modprobe.d/options

    Add this to the end of the file to make sure colors are displayed correctly. Unless of course you are happy looking like a smurf 😉

    options gspca force_rgb=0

    In the original tutorial the value was supposed to be 1, but for my laptop setting it to 0 seems to be correct value. Now save the file and close gedit.

    Now we are ready to load the module, so we can check out webcam is working.

    sudo modprobe gspca

    Now check that the device node exists.

    ls /dev/video*

    The result should be something like mine here:

    /dev/video0

    If you did get a similar result the webcam is now ready for testing. First we need to install a webcam application to use for testing. Camorama is perfect for this. If you dont already have it installed just use this command

    sudo apt-get install camorama

    And now we can start the application with

    camorama

    But whats this ?! You seem blue in the face.. have no fear my blue friend. In Camorama under ‘view’ select ‘show effects’.Now the effects pane is added to the dialog. Right click and ‘add filter’ and select the ‘color correction filter’ Now you should instantly become more humanised colors.

    The trick here is that its only camorama, so far that i know of, that reverses the colors. So using the color correction filter it shows correctly. Other applications don’t need this. So fire up Ekiga softphone to further test out your webcam and in general just have fun 😀

    Hope this helped some people, especially users with this specific laptop. Questions, or comments can be left in comments section 😀

    source: ACER Orbicam integrated webcams now supported by GSPCA

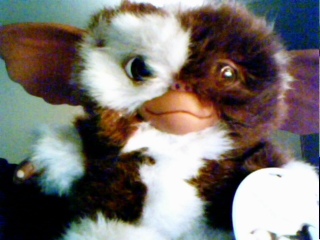
    Image taken with the webcam:

    gizmo webcam

  • Guitar Hero for free!

    Today i made an amazing discovery i did not know about. An open source game that replicates the gameplay of the famous Guitar Hero. You use the keyboard to make frets, and string with the return key. Its hillarious fun to try and keep up and i barely managed at easy level.
    Of course having an actual guitar controller would be more fun, but for a game you can get on multiple operating systems and that runs great its a must try!

    So head on over to the Frets on Fire website, and download the greatest game i have played in a bit ! 😀

    Here is a little screenshot:

    frets on fire screen

  • Ubuntu 7.04 Feisty Fawn available for download…

    Its here, so grab it while its hot 😀

    Download Feisty Fawn

    UPDATE: I have a review of this release in the making. Of course there are already a ton of reviews to pick and read. Anyhow my review comming … hang tight

  • gDesklets – widgets for linux

    Okay this time i want to share how to install, setup and use gDesklets for linux. More specifically as i always do using Ubuntu Linux. Its a small easy guide and there isn’t a lot too it, so lets get started:

    Installation

    First we, of course, need to get gDesklets installed. Right now i am writing from Ubuntu Feisty Fawn Herd 5, and gDesklets was already installed. But should you be using an earlier version of Ubuntu just open up a terminal (applications -> accessories -> terminal) and type in the following command:

    sudo apt-get install gdesklets

    It should prompt for your admin password, and after you enter it gDesklets will install. Expected more ? Well thats it 😉

    Configuration

    There is not alot to configure. We want gDesklets to startup everytime with gnome. So under System -> Preferences -> Session we will find a way to make gDesklets startup automatically. Under ‘Startup Programs’ we click ‘new’ and both under name, and command enter ‘gdesklets’.
    Now gDesklets will start automatically with you gnome. Since we are not a big fan of restarting just to see what we just installed we want to boot up the gDesklets deamon right away. Open up the terminal again and type:

    gdesklets &

    Now the gdesklets icon should pop up in your system tray in the upper right hand corner.

    desklets tray icon

    Now you can right-click the icon and either select manage desklets or configuration. There is not a big deal to configure, so we are going to jump straight to ‘manage desklets’.

    Managing desklets

    In the manage desklets dialog you can select various desklets to add to your desktop. Each desklet can be individually configured by right clicking it. Just to get you started we will add one of my favorite desklets, a simple countdown timer.

    gDesklets main windows

    Under the category ‘Misc/Utilities’ you will find ‘Countdown2’. simply double-click it, and move your cursor to the desktop. You will see the desklet following your cursor, and you can click again to drop it.

    Now you have your first desklet running, and it will start automatically upon next reboot.

    Finally a note about my own personal experience with desklets. They are awesome 😉 But not without grief. Some desklets wont work, some will only work with limited functionality ect. But even with the most basic desklets working they are still nice to have lying around. I especially use my countdown a lot for knowing how long too upcoming deadlines.

    Enjoy the world of linux with desklets 😀